How to install magnetic paddle shifters
Swapping your factory paddles for a EuroCustomAutos magnetic carbon set. Airbag off, one plug per side, no coding.
What you are actually doing
Factory paddles are two small switch units screwed to the back of the steering wheel, one each side, each with its own plug into the wheel wiring. Our magnetic set replaces those units outright. The difference is the mechanism inside: a magnet returns the paddle instead of a plain spring, which is where the crisp, positive click on every shift comes from.
The swap itself is short. The airbag comes off to give you access, the lower trim on the back of the wheel comes off, and each factory paddle is a few screws and one plug. The magnetic units go into the same positions and plug into the same connectors. Nothing is cut, nothing is spliced, and there is nothing to code. On most cars the steering wheel stays on the column the whole time.
Choose your style
The magnetic mechanism and the install are the same whichever blade you pick. What changes is the shape, the length, and the material. There are ten options: six shapes in carbon fibre, the long blade in two forged carbon finishes, and one in machined aluminium.
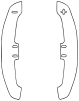
Long blade
Carbon fibre5.49 × 1.17 in 139 × 30 mm
A full length, straight backed blade that runs well past a factory paddle. It is also the shape the forged versions, 07, 08 and 09, are cut from.

Short, rounded
Carbon fibre3.46 × 1.28 in 88 × 33 mm
Close to factory size with softer, rounded edges. The subtle choice if you want the carbon and the magnetic click without changing the look much.

Short, wide
Carbon fibre3.16 × 1.46 in 80 × 37 mm
The widest face in the range on the shortest blade. A big, easy target in a compact size.

Mid length
Carbon fibre3.59 × 1.16 in 91 × 29 mm
A step up in reach from the short shapes, with a tapered top. The middle ground between factory and full length.
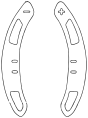
Curved, vented
Carbon fibre5.55 × 0.84 in 141 × 21 mm
The slimmest blade, curved to follow the rim, with cut out windows. Long reach with the least visual bulk.
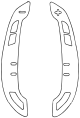
Long, vented
Carbon fibre5.61 × 1.34 in 142 × 34 mm
The longest in the range, with cut out windows along the blade. The most aggressive look of the ten.
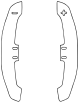
Long blade, flake
Forged carbon, flake5.49 × 1.17 in 139 × 30 mm
The style 01 shape in forged carbon with metallic flakes set into the finish. Styles 07 and 08 share this shape and differ in the flake finish.
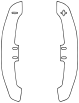
Long blade, forged
Forged carbon5.49 × 1.17 in 139 × 30 mm
The style 01 shape in plain forged carbon, for the marbled pattern without the flake.

Machined aluminium
Aluminium alloy4.51 × 1.14 in 115 × 29 mm
The only metal option, with a recessed channel down the length of the blade. Pairs well with a car that has aluminium interior trim.
Drawn to scale against each other. Dimensions are per paddle, length by width. The left paddle carries the minus mark and the right the plus.
How to pick. Length is the big decision. The short shapes (02, 03, 04) sit close to a factory paddle and keep the look subtle. The long shapes (01, 05, 06 and the forged versions) reach further around the rim, so there is always paddle within reach of your fingers without moving your hands, which is where they earn their keep on a spirited drive. After that it is taste: plain weave carbon, forged carbon, or aluminium. Not every style is made for every car, so tell us the style number with your year, make and model and we will confirm both before you order.
Before you start
- Confirm the car has factory paddles. If there are no paddles behind your wheel now, these will not fit and will not work. Some manuals and base trims never had them.
- Confirm the car has a manual shift mode. The paddles only send an up or down signal. The gearbox has to support manual mode for that signal to do anything, which every DSG and paddle equipped automatic does.
- Count the parts. Two units marked left and right, the hex key, and four screws. A missing screw is easier to sort out before the airbag is on your bench.
- Clear the work area of loose metal. The units have magnets in them, and they will pick up screws, filings and bits of wire from a tool tray. Anything stuck to the mechanism spoils the feel.
Step 1: Prep and disconnect the battery
- Park with the front wheels straight and the steering wheel centred. Parking brake on.
- On a VW, switch to accessory mode first (dash on, engine off), then disconnect the battery. With the car fully off, the electronic steering lock clamps the column as soon as power is cut, and you need to turn the wheel to reach the airbag release points in the next step.
- Disconnect the negative battery terminal with a 10mm wrench and tuck the cable away from the post.
- Wait at least 15 minutes. The airbag system holds a charge after the power goes.
Step 2: Remove the airbag
The airbag is released from the back of the steering wheel, and the method depends on the car. On a VW Golf, MK7 through MK8.5, it is held by wire spring clips reached through small access holes on each side of the wheel.
- Turn the wheel about 90 degrees to bring the first access hole into reach. Put a thin flat screwdriver in and push firmly toward the centre of the wheel until the spring clip lets go and that side of the airbag pops loose.
- Turn the wheel the other way and repeat on the other side, then bring the wheel back to centre.
- Ease the module forward. It is still wired in, so do not pull it.
- Unplug the airbag connector. On a Golf it is easiest to disconnect at the clock spring on the column side rather than at the back of the airbag. Unclip the button wiring if it is clipped to the module, and pull the horn contact if fitted.
- Set the module down somewhere safe, pad facing up, away from heat and away from where you are working.
Full walkthroughs with photos are in our steering wheel removal guides for VW, Audi and BMW. For this job you only need the airbag steps. Stop before the centre bolt.
Step 3: Remove the factory paddles
- Take off the lower trim cover on the back of the steering wheel. Undo its fasteners and work it free with a plastic trim tool rather than a screwdriver, which will mark the plastic.
- Find the mounting screws holding each factory paddle unit to the wheel frame. They are usually small Torx screws. Use a driver that fits snugly, as these heads round off easily.
- Take a photo of each side before anything moves, showing how the paddle wire is routed through the wheel. That photo is your reference when the new units go in.
- Undo the screws, unplug the paddle from the wheel wiring, and lift the unit out. Repeat on the other side.
- Bag and label the factory paddles and every screw. Keep them. If you ever sell the car or need to go back to stock, you will want them.
Step 4: Fit the magnetic paddles
- Check left and right before a single screw goes in. The left paddle is the downshift, the right paddle is the upshift. Each unit only fits its own side properly, so if it does not sit flush, you likely have it on the wrong side.
- Mount each unit in the factory position and start the included screws by hand.
- Snug them with the supplied hex key only. Firm, not tight. Over tightening can crack the paddle housing or pinch the wiring inside it, and a power driver will do it before you feel it.
- Plug each unit into the factory paddle connector. The plugs only go one way and should click home. No adapter and no wiring changes are needed. If a plug will not go in, stop and check it is the paddle connector rather than forcing it.
- Route the wiring the way your photo shows and tuck it into the wheel cavity. It must sit clear of the airbag mounting points and the trim cover clips, or it gets pinched when everything goes back together.
Step 5: Reassemble and test
The battery cannot go back on with the airbag unplugged, or the car will log an airbag fault. So everything goes back together first, then you test.
- Refit the lower trim cover and its fasteners, checking no wire is trapped under an edge.
- Reconnect the airbag connector until the lock clicks, then the button wiring and the horn contact.
- Line the airbag up and press it into place until both sides click and it sits flush all the way round.
- Reconnect the battery with nobody sitting in the car and the doors closed.
- Switch the ignition on and watch the airbag light. It should come on for its self check and go out. On some cars a fault gets stored simply because the airbag was unplugged, even when every connector is back on properly, and it has to be cleared with a scan tool before the light goes out. If it stays on, see common problems below and do not drive the car.
- Feel test: pull each paddle a few times. Each should click cleanly and snap back without sticking or rubbing on the trim.
- Function test: on a short, quiet drive, put the car in manual mode and check that the right paddle upshifts and the left paddle downshifts, with the gear showing in the cluster. Check the horn and the steering wheel buttons while you are at it.
Common problems
Almost everything that goes wrong on this job is a plug that is not fully seated. The paddles themselves are rarely at fault.
- Airbag light stays on. An airbag plug is not fully clicked in, or the battery went back on with someone in the car or a door open. Disconnect the battery, wait, reseat every airbag connector, and try again with the car empty. If it is still lit, a fault code is stored and needs VCDS, OBDeleven or a capable scan tool to read and clear. Do not drive on a lit airbag light.
- A paddle does nothing. That paddle's plug is not home. Reseat it until it clicks. If both are dead, confirm the car is in manual mode and that it has a manual mode at all.
- The paddles work backwards. The units are on the wrong sides. Swap them.
- A paddle feels loose or rattles. Check the mounting screws are snug and the paddle blade is fully seated on its unit. If it is not holding firmly, take it off, clean both mating faces, and refit it.
- Horn does not work, or sounds on its own. The horn contact is not seated. Pull the airbag and check it.
- Buttons or cruise control dead. The button wiring was not reconnected, or a connector is only half on.
- The airbag or trim will not sit flush. A wire is caught behind it. Take it back off and re tuck the wiring before forcing anything.
Looking after them
- The carbon scratches. Keep rings, keys and hard objects off the paddles, and do not rest the wheel face down on a hard surface while it is apart.
- Keep the magnets clean. Wipe dust off regularly and keep them away from metal debris and strong magnetic or electrical equipment, which can spoil the shift feel.
- Check the wiring now and again, especially if you notice any change in how a paddle feels. The harness moves every time the wheel turns.
Other guides
Refreshing the whole cockpit? See our steering wheel wrap guide, or steering wheel removal for VW, Audi, BMW and Porsche. Or browse all our DIY guides.